Monday, November 2, 2009

"What's in Your Bait Box?"

Preparation for the twist to the Right first...

Right ascending colon compression

"Half Lord of the Fishes Pose" to the Left or
 Ardha Matseyendrasana

"Half Lord of the Fishes" twisting Left
Exactly what did Jesus mean when he saw two brothers, Peter and Andrew, fishing in the Sea of Galilee and said to them, "Follow me and I will make you fishers of men." If Jesus was talking about the process of catching the attention of men the way that bait catches the attention of the fish, does any and everything work? If we put a live worm on a hook to catch a rainbow trout in a mountain stream, we probably won't get much attention because that trout is looking for flies that have just hatched. So our bait box better contain a few "dry flies" like a "Parachute Adams" that will lure the trout we're trying to catch. A sense of the appropriate bait seems most effective.
It's helpful to be mindful of this principle of using specific lures that are
appropriate to catch the attention of specific creatures when trying to attract "followers" for a blog. So did I catch any fishermen this week? Yoga has become more mainstream over the past ten years that I've been teaching and so it's been easier to catch the attention of students and then redirect them into a relationship with their Creator. I pray that I'm becoming a more effective "fisher of men." Think about this as you explore this week's twisting yoga pose called "Half Lord of the Fishes" or Ardha Matsyendrasana. However, do not attempt this intense twisting posture if you are pregnant or have herniated discs!

  • Physically---It's best to enter any twisting posture after a few warm-up rounds of "Salutations to the Son" or at least several rounds of the lateral stretches described in last week's blog. Gentle warm-up twists can even be performed while sitting in "Adept's Pose," twisting on an exhalation first to the right after lifting and lengthening the spine on inhalations, and then to the left. (Notice a pattern here? I usually attempt to create some continuity from week to week so that "followers" can link the postures together.) Once all parts of the torso are warmed up and stretched out, sit on a fairly flat and level surface and bend the left knee to bring the left foot under the buttocks. The heel of the left foot is directly under the left "sit bone" (base of the hip bone) while the right "sit bone" rests in the arch of the left foot. If this is too uncomfortable for beginners, please modify the position and place the left flexed foot at the base of the perineum, as in "Adept's Pose." A modified version of this twist can also be performed while seated in a padded chair without arms by sitting on the left foot first.
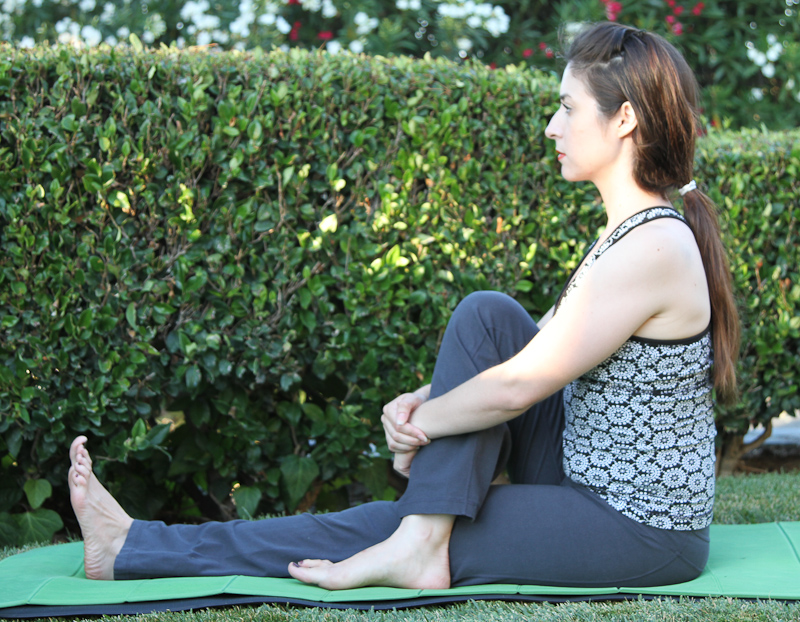
  • Begin "Half Lord of the Fishes Pose" (as all twisting postures) with an inhalation while grounding the sit bones to lift and extend the spine, and then bend the right knee and place the right foot just outside the left thigh as close to the hip as possible. Exhale while hugging the right bent knee into the right side of the abdomen, using both arms at first to create healthy abdominal compression. Remain in this transitional phase of the pose for several breaths to relax the joints before stabilizing the hips and lower lumbar back. Then, twisting like a spiral staircase from the base upward, inhale while pressing the right hand behind the right hip to ground and lift the pelvic floor and abdominal muscles (the mula and uddiyana bandhas) in order to support the lower spine. At first it's important to enter this intense spinal twist without using the leverage of the arms. Never force the spine into a deeper twist!
  • Then slowly place the left bent elbow outside of the right bent knee with the palm facing to the right and exhale to look over the right shoulder. With each inhalation lift and extend through the torso so that there is healthy space between each vertebrae, never sacrificing extension for deep flexion. Keep the lower body, especially the hips, as a stable base for this twist and use each exhalation to explore and deepen the twist by gradually deepening the lower abdominal contractions (the bandhas.) Remain in your deepest version of the twist for 3-5 breaths, and then slowly relax the core muscles on an inhalation to come back to center. Exhale while switching to place the right foot under the sit bones or at the base of the perineum and hug the left bent knee into the abdomen for several transitional breaths. Proceed with caution as you lift, lengthen and lock the bandhas twisting to the left without the leverage of the arms at first. Once you're experiencing your deepest version of this twist to the left, remain for 3-5 mindful breaths before inhaling back to center.
  • Mentally---The dynamics of belly versus chest breathing can be explored effectively in this intense seated twisting pose as long as the attention is completely focused on the coordination of internal engaging and releasing of muscles in sync with the breathing. At the beginning it's easier to "belly breathe" by relaxing the abdominals at the onset of each inhalation, and then engage the side body by lifting the "flying up locks" in the waist area. Once the tension in the lower abdomen and ribs is released, this area can then be stabilized at the beginning of each inhalation by engaging the locks (bandhas) in order to experience "chest breathing" as the diaphragm action moves into the rib cage. This stable base with an active upper body greatly intensifies the rotation in the spine so it must be done gradually and mindfully. The twist on each side should begin with relaxed "belly breathing" and then progress to deepen the intensity by engaging lower abdominal contractions and maintaining these "root locks," even while initiating the next inhalation in order to experience "chest breathing." Since all parts of the torso are actively engaged to twist and look over the shoulder, it's crucial to balance the action throughout the spine by mobilizing all muscles in the torso from the waist upward.
  • If all this is too much to put together for beginning yoga students, try not to become discouraged! This is the time to realize the importance of studying the complexities of yoga under the supervision of an experienced and certified yoga instructor. Do your homework and research your teacher's background.
  • Spiritually---While experiencing this intense twist that massages all of the lower and upper abdominal organs, remember that yoga is simply a technical tool to teach a physical and mental discipline that relieves suffering. The real point to teach you to become disciplined spiritually by connecting you in a close relationship with your God. If yoga is the bait to lure you into spending quiet time alone, then don't forget to real in the true prize by connecting to your Creator, giving Him your undivided attention and gratitude while you practice.
So get fishing, but don't forget to use the appropriate bait! plf


Monday, October 26, 2009

"Go Slowly into the Day"

Our bodies are like a giant test tube of chemicals so, in a sense, it's true that we are what we eat. (Yikes! Ed Moon, if you're out there, I can't believe I just quoted your jabs at me in the teachers' lounge of High School District 214, state of Illinois, early 1970's!) As I approach the holidays noted for over-eating unhealthy food and beverages in ridiculously excessive quantities, I've decided to prepare myself with a new mantra---"Less is more." This is especially true for the elderly because the digestive system has most likely been over-worked for longer periods of abuse, but the young should also be aware of the cumulative effects of abusing the physical body with too much low-grade fuel. It seems that our bodies also keep a journal of the decisions that we make!
This is the very reason that I've decided to more slowly and purposefully into each day by beginning with mindful meditation after my morning prayer and yoga time. By becoming more astutely aware of the connection between what I ingest in my physical body and what I ruminate in my mind, I hope to be ready for a transformative 2010 generated by a New Year's resolution to "go slowly into the day." Even though I know better, I often cut my prayers and yoga session short because I get the feeling that I should be doing something else! Or worse yet, I push myself to move into a new posture, or I abbreviate the time spent in an important restorative position. Yes, even yoga instructors are "a work in progress," as I mention in my blog intro.
After prayer and meditation, rather than rushing out of last week's seated posture called "Adept's Pose" or Siddhasana, try remaining seated calmly and patiently for a few rounds of this very slow and gentle sequence of breath-synchronized movements (called a vinyasa flow in the ancient Sanskrit language.) Almost anyone can participate in this type of yoga since it focuses on the slow and coordinated movements of the upper body. Remember that the intent is to move very slowly and mindfully with the breath, allowing the breath, not the body, to lead.
  • Physically---Begin by sitting comfortably, either in "Adept's Pose" or on a padded chair, and flow peacefully with the arms for 3-6 rounds of the following sequence:
  • While slowly inhaling a full ujjayi (victorious) breath, raise the arms with the inhalation out to the sides and then straight above the head until the hands touch (called "Upward Salute" or Urdhva Hastasana). If you don't have high or low blood pressure and are not pregnant, you may pause here to look up at the thumbs to stretch at the top of the inhalation for what is called antara kumbhaka. Do not rush into the exhalation!
  • As the exhalation begins, slowly lower the straight arms down to the starting position with the hands floating back onto the inner knees as the chin lowers onto the raised chest into what is called the "Chin/Throat Lock" or seal (Jalandhara Bandha). Again, if you do not have high or low blood pressure and are not pregnant, you may pause here at the end of the breath for bahya kumbhaka. Attempt to keep the exhalation as long or longer than the inhalation to prevent the light-headedness caused by a build-up of carbon dioxide in the bloodstream.
  • After practicing very slow and rhythmic movements of the arms in sync with the breath, you may try adding the "Root Locks" (Mula and Uddiyana Bandhas) during the pause at the top of the inhalation by drawing the pelvic floor and abdominal muscles in an upward lifting motion. After 3-6 rounds of practice that coordinates movement with the breath, reverse the position of the legs (left ankle will move to the top of the right ankle) after a brief break in "Staff Pose."
  • Once the flow of the arms with the breath becomes natural, try adding lateral or side stretches by lowering one arm at a time to the floor in line with the hip but stretched away from it. Keep the upper arm stretching straight over the ear while looking up under that arm as the side body stretches and leans into the hand on the floor. Inhale back to the "Upward Salute" arm position, and then reverse to the opposite side. With each stretching flow to the side, place the hand further away from the hip to increase the stretch in the side body.
  • Mentally---Be sure to move as slowly as possible, and stay alert by counting the number of breaths in each position to keep the mind from wandering out of the present moment. Once the movement of the arms and breath become rote, you can begin to focus the attention on coordinating the internal lifting of the "locks" with the breath for support in the torso. The upper body will become long and lean with multiple repetitions of this easy vinyasa flow series, but be sure to perform the same number of repetitions on each side, unless one side is already imbalanced and you're trying to improve and balance that side.
  • Spiritually---To add a spiritual dimension to the arm movements with the breath, acknowledge your Heavenly Father in the "Upward Salute" as the source of every breath you take. On the exhalation pause the arms very briefly at shoulder height to acknowledge Jesus your Redeemer as you experience the surrendered release from your sins through His grace. Then bring the palms together at the end of the exhalation in prayer position (called anjali mudra) instead of resting the hands on the inner knees, and pause to acknowledge the peaceful presence of God's Holy Spirit within you. Attempt to make each graceful movement a "meditation in motion" as you savor the journey during these slow and peaceful movements.
"In all thy ways acknowledge Him, and He shall direct thy paths." (Proverbs 3:6, KJV)

"Whosoever denieth the Son, the same hath not the Father; [but] he that acknowledgeth the Son hath the Father also." (I John 2:23, KJV)

Pause often to enjoy the journey without concerns about any particular destination....plf

Monday, October 19, 2009

"Practice with Limitations"

If you're looking for excuses not to practice yoga, in my way of thinking there are none! Remember that yoga consists of more than physical postures. In fact, yoga is even more than the sum of its eight limbs. The asanas are only one of the eight components or ingredients (number three) that can be practiced in an effort to yoke with your Creator. If you're recovering from surgery and have limited mobility, you can always practice sitting still but comfortably for extended periods of time with the mind focused on smooth and steady breathing techniques. Meditation practice provides an ideal opportunity to become available to God and to experience gratitude to the Source of those life-giving breaths.
The key to sitting comfortably for long periods of time is not necessarily to find a cushy chair with back support, unless you want your core muscles to atrophy. Rather, the key is to practice seated positions, especially the traditional "Adept's Pose" called Siddhasana for long periods of time without the support of a chair back. In order for most people to experience some degree of comfort in a seated posture, the hips should be slightly elevated above the knees so that the natural spinal curves can be maintained. If this "hip above the knees" cannot be accomplished with the aid of props such as pillows and folded blankets under the tail bone and hips, then a chair should be used for seated practices such as pranayama and meditation. This means that even those individuals who are
confined to a wheel chair can practice yoga---yoking body, mind and breath with an infinitely powerful Creator.
  • Physically---Begin all seated postures on a level floor with the legs extended straight out from the hips in "Staff Pose" or Dandasana (described in the June 22nd blog.) Take time to assess whether tension in the hamstrings or hips is preventing an erect posture with the natural curves of the spine intact, especially in the lower back. If necessary, place a pillow or folded blanket under the hips to insure a comfortable forward tilt in the pelvic basin, OR sit in a chair with a padded seat. Using both hands, bend the left leg at the knee and hold the flexed left foot with both hands to seat the heel of the foot at the base of the spine (the perineum) with the sole of the left foot resting against the right inner thigh. Next bend the right knee and place the right ankle over the left with the heel of the right foot pressing against the pubic bone. Finally, tuck the sole of the right foot just between the left thigh and calf with the right heel pointing upward. If you have unusually tight hips or hamstrings, do not force the feet into this position called Siddhasana. Use folded towels to pad the uncomfortable regions around the ankles or behind the knees. Once a level of comfort is achieved stretch both arms forward to rest the backs of the hands lightly on the inner knees so that the palms face upward with each thumb and forefinger touching softly in jnana mudra.
  • With each inhalation press down into the sit bones at the base of the hips while lifting upward through the spine with the head aligned directly above the spine and between the shoulders. Be careful not to lean forward onto the heels, but support the weight of the head and upper body with an erect posture utilizing skeletal alignment in addition to the core muscles of the pelvic floor and abdomen. Remain in this basic seated posture with the right foot on top for several minutes (until the breath becomes labored or uneven), and then release the legs one at a time to relax for several breaths before reversing the legs. On an inhalation place the right flexed foot at the base of the spine (perineum) and then exhale the left foot into place in front of the pubic bone with the left heel facing upward. Switching sides in this basic "Adept's Pose" helps to alleviate stiffness in the knees and ankles, while toning the lower spine and abdominal organs.
  • Mentally---Attempt to rest in Siddhasana on this reversed side for at least as long as the first side, allowing the position of the crossed legs and erect back to keep the mind attentive and alert. If practicing breathing techniques (pranayama) be sure to monitor the length of each inhalation and exhalation so that the duration of each becomes even. As soon as there is one second less on either portion of a cycle of breath---inhalation or exhalation---this signals that the body is ready to make a change in position. Do not attempt to practice breath retention (kumbhaka) techniques if you have high or low blood pressure. It is best to practice these advanced breathing methods under the guidance of an experience yoga instructor.
  • Spiritually---Once this basic seated pose becomes so comfortable and the breathing pattern so smooth and regular, it's time to focus your attention on the relationship with the object of your affection. This does not mean a male or female friend, but in meditation practice it means thinking only about the spiritual relationship and connection that you have with your Maker. Begin to experiment with removing the distractions of the sense of sight by closing the eyelids lightly to withdraw from all visual diversions. Absorb your sense of hearing in the soft, sibilant sound of each cycle of breath and withdraw from any outer sounds that surround you. Now you are beginning to practice the fifth limb of yoga called pratyhara, or withdrawal of the senses, so that you can focus on God's words from Scripture in order to release the most difficult aspect of yourself---your will. As the Book of James puts it:
"For that ye ought to say,'If the Lord will, we shall live, and do this, or that." (James 4:15, KJV)

Monday, October 12, 2009

Varying your Shape in "Bow Pose"

"Bow Pose" or Dhanurasana
In order to bring variety into my daily yoga practice I'll often vary the shape of many poses with the intent to experience slightly different results. At least every other day I try to include "Bow Pose" (or Dhanurasana) with its variation on the side (called Parsva Dhanurasana) in order to relieve the growing stiffness I'm noticing in my spine as I age.
Recently I read an article in the Body and Brain health magazine that suggested crossing the legs at the ankles to increase circulation to the spleen. This fist-sized organ, located just under the diaphragm high on the left side of the abdomen, filters blood and is therefore an important part of the body's immune system. So now I cross my ankles in "Bow Pose" a couple of times a week just to insure that my spleen is experiencing that extra massage that squeezes and soaks all the abdominal organs with freshly oxygenated blood. Try it; you'll like it!

  • Physically---As with the traditional "Bow Pose," be sure to warm the joints and muscles with a few rounds of "Salutations to the Son," or simply flow back and forth slowly with the breath from "Downward-Facing Dog" on the exhalations to "Plank Pose" on the inhalations, and then back to "Down Dog" again. Then lower slowly on an exhalation (if possible through "Four-Limb Stick Pose" called Chaturanga Dandasana described on May 4th) onto the front of the body and stretch out face down on a flat and fairly level surface. Inhale to bend both knees and actively ground the front of the thighs and pelvic bone down into the floor before exhaling again to draw the heels of the feet close to the hips with the feet crossed at the ankles.
  • It may be easier to reach the top of the foot closest to the hips first, and then the foot on top, before moving to a firm grip of the hands at the ankles. If this is not going to happen on the second attempt, try looping a belt or strap around both ankles and hold both ends of the prop, one in each hand, as close to each foot as possible. As the chest expands with the next inhalation, ground into the pubic bone while lifting the crown of the head to extend the spine and the upper torso. With each inhalation cautiously work the top of the thighs in extension to lengthen through the legs , and use each exhalation to release the hip flexors as the feet are actively drawn upward and away from the hips. Be careful not to overstretch the front of the shoulder joint
  • Remain in this variation of "Bow Pose" for 5-6 breaths, allowing the chest to remain open and lifted before releasing onto the right side of the face to stretch out and rest for several breaths. Then reverse the crossing of the ankles to experience the maximum stretch on the side of the foot that is on top. I like to begin with the right foot on top and end with the left foot on top in order to work up to the more intense stretch of the left side where the spleen is located. Try to work up to at least one minute (5-8 full cycles of breath) on each side.
  • Remember to roll onto the back to experience the restorative benefits of "Corpse Pose" (Savasana described in the January 24th blog) for a minimum of five minutes.
  • Mentally---Since "Bow Pose" is a bound position in which the muscles and joints of both the arms and legs are working to draw the spine into a backward-bending bow shape, it is crucial to stay very aware of the sensations of pressure in the vulnerable knees and shoulder joints. Attempt to even the work between the arm and upper thigh muscles by grounding the pubic bone in the front of the body on inhalations while working the hamstrings and pectoral muscles in an even extension of the spine. Also experiment with not rocking back and forth on the abdomen with each breath by directing each inhalation into the already expanded chest. Stay focused and present with each breath and body sensation.
  • Spiritually---We've all spoken words that we wish we could unspeak. But just as a bell cannot be unrung, so we cannot "Control Z"---that's computer speak for "undo"---our spoken words. They spring forth like arrows shot from a bended bow, sometimes into the hearts of those we care deeply about. While holding your physical body silently in this week's "Bow Pose" variation, practice emptying yourself of all mean-spirited or wicked thoughts so that they don't become spoken words that can never be undone.
"For, lo, the wicked bend their bow; they make ready their arrow upon the string, that they may privily shoot at the upright in heart." (Psalm 11:2, KJV)

May the words of my mouth and the meditations of my heart be ever pleasing to You, O Lord....plf

Monday, October 5, 2009

"Plow it Under and Put it to Rest?"

"Plow Pose" or Halasana
In rare instances the bonds in a relationship are so strong that the person remains a part of our life for the long haul---for a lifetime. But occasionally a relationship will end. Sometimes it's only a temporary pause in the connection before circumstances change and the friendship resumes. But frequently actions or words spoken in anger have caused so much pain that the memory of them blocks intimacy for a long period of time. Then it's time to ask the tough questions that will help to make a tough decision. Can that memory be plowed under and put to rest so that the relationship is saved? Or is it time to walk away and put the relationship to rest? As the song goes, "They say that breaking up is hard to do...." The challenge is to keep whatever is plowed under totally buried, and never to dig it up again! To avoid being stuck in the past we move on toward our destiny.
An inverted yoga position called "Plow Pose" or Halasana encourages the physical process of elimination by urging movement of toxins from the body. Free movement in the bowels creates a sense of lightness and can lead to clearing the mind of toxic thoughts. Although "Plow Pose" is a basic inverted forward bend that can be practiced safely by those with high blood pressure, it is not recommended for pregnancy. Also, do not practice "Plow Pose" if your intestinal tract is already moving too freely with diarrhea.

  • Physically---Begin by lying on the back after warming up the spine with several rounds of "Salutations to the Son" described in three consecutive earlier blogs (April 27th, May 4th and 11th.) Then follow last week's blog to move cautiously into the supported version of "Viparita Karani" with the hands under the hips and the legs actively extended straight upward. If you are using a prop under your hips for support you may also need to prepare for "Plow Pose" by placing a small bench or chair behind your head. This prop will prevent you from forcing your feet to the floor before your spine and hamstrings are ready, and it will provide support for the weight of the lower limbs as you attempt to bring your hips directly above your shoulders.
  • On an inhalation draw up the pelvic floor muscles (mula bandha) and lift the abdominals (uddiyana bandha) for core support before attempting to exhale the toes onto the floor or a previously placed prop behind the head. Never force the feet to the floor before the spine and hamstrings are ready to release in this inverted forward bend. The weight of the hips and legs should press into the tops of the shoulders, the upper arms and the back of the head---not the back of the neck. As in seated forward bends the tail bone is drawing away from the heels of the feet to create healthy space between each vertebra. The toes of the flexed feet can also provide support as they press actively into a prop or onto the floor behind the head to help lift the hips upward and directly over the shoulders. It is important to keep the chin centered and pressing lightly into the sternum (breast bone) in a chin/throat lock called jalandhara bandha. Beginners new to this pose will gaze at the tip of the nose at first and then may shift to the internal "third eye" drishti---naitrayoh ma dyai---to avoid turning the gaze to the left or right, but keeping the head aligned directly over the spine.
  • To help in the grounding action the hands may move up each side of the back just below the shoulder blades with the elbows no wider than the shoulders. With each inhalation the tail bone is extending up over the shoulders with active abdominals and hamstrings while the tops of the shoulders are grounding down into the floor and away from the ears. If the breath is moving smoothly and freely, you may be ready to release the palms of the hands onto the floor stretching them away from the feet. Then interlace only the thumbs with the palms facing down, and eventually interlace all ten fingers with the little fingers pressing onto the floor.
  • At first, the breathing may be restricted by the intra-abdominal pressure, but this can be relieved by broadening the base of the rib cage to allow the shift of organs toward the head. Attempt to breathe freely in "Plow Pose" for 5-6 smooth breaths before releasing each vertebra down to the floor from the top of the spine, as carefully as you would lower a string of expensive pearls. Finish by lying on the back in "Corpse Pose" (See the January 24th blog.) for several minutes with the sacrum and each shoulder blade placed flat against the floor for support.
  • Mentally---"Plow Pose" can be very risky because it can over-stretch all of the curves in the spine---especially the neck and upper back---if not performed mindfully and with enough conscious support in the proper places. Be sure to warm up properly and then move slowly with awareness from one phase of the pose (Viparita Karani) to supported Halasana before attempting other variations that will be described in next week's blog. Always support the legs to protect the back. By closing the eyes and focusing inwardly on the body sensations in the neck, shoulders, chest and the back of the thighs, your inner God-tuition will tell you when you are at your "edge" before pain. There should be no sensations of shooting pain or burning in any muscle or joint. Always approach invervions with cautious confidence.
  • Spiritually---Since we are getting things moving and churning in the physical posture called "Plow Pose" we are beginning a process called change. Being stuck in stagnancy is not good for the intestines, the mind or the emotions. Sometime we must move on and forget the past in order to press forward toward our "Personal Legend." As the apostle Paul put it:
"...but this one thing I do, forgetting those things which are behind and reaching forth unto those things which are before, I press toward the mark for the prize of the high calling of God in Christ Jesus." (Philippians 3: 13-14, KJV)

My prayers go out for your courage to cleanse....plf

Monday, September 28, 2009

"Facing Your Monsters"

"Inverted Pose" or Viparita Karani
To embark on risk-taking involves a degree of trust in ourselves and that our God is truly sovereign. While attempting to face a few of my smaller fears, I have on occasion reluctantly stroked non-poisonous snakes at petting zoos, and most recently a barrel ray in an aquarium tank, but it's not exactly a comfortable activity. I confess to an illogical fear---or maybe it's just a healthy respect---of God's little creatures. This includes most insects (not lady bugs, of course!) but especially spiders great and small. Yes, I have arachnophobia and usually call upon my husband to take care of these scary situations in any way that he chooses. Then I feel guilty for not picking up the little guy, even with a piece of very large paper, and placing him outside where he belongs.
Who hasn't experienced a fear of some thing or situation? Lately I've heard much discussion of the "fear of success", but we all know that it's actually a fear of failure. Even though we realize that phobias can debilitate and prevent our appreciation of enjoyable things and situations, we continue to fear because we're trying to prevent the suffering that may be associated with the thing or situation. Yet our fears often become the torment themselves. When we don't know the outcome we hesitate to make the effort required to "face our fears" by taking risks. And so I encourage my students (and myself) to approach each yoga position with "no fear" and no expectation of a specific outcome because it may be different in each experience. There are so many variables that affect our emotional state, our physical strength and our range of motion on any particular attempt. Therefore, it's best to approach each pose, and most especially inverted positions, as a mindful exploration that reveals the present state of the body, mind and spirit.
It's crucial to face any
fear of being upside down with mindful awareness of all physical body sensations, but especially the quality and rhythm of the breath. This week's basic supine "Inverted Pose" or Viparita Karani involves lying down and reversing the gravitational pull on the body and its organs. The total experience will be greatly affected by physical factors such as individual differences in weight distribution and body proportions , but also by the all-important state of mind. Practice with confidence while trusting your mind to control the body. Warning: But do not practice any form of inversions if you are pregnant!

  • Physically---Enter the "Inverted Pose" called Viparita Karani only after warming the joints and muscles by taking the body through the series of backbend positions described in the previous four blogs that all involve backward bending postures. I especially recommend the counterposing flow from Apanasana to Dwi Pada Pitham ("Two-Legged Table Pose"). Then proceed to lift up into "Bridge Pose" (Setu Bandhasana) with the heel of the hands supporting the back of the hips at the sacroiliac joint. If you discover that your hip flexors and quadriceps across the front thighs lack the flexibility necessary to lift into a full "Bridge Pose" simply place a block or thick book under the sacrum to support the weight of the hips.
  • OR a less intense variation of this pose is to place the prop (a block or thick book) next to a blank wall and sit on the block with the side of the body about 10-12 inches from the wall. Slowly swing one bended leg at a time onto the wall for support. Straighten the legs and rest with them directly above the hips in this "Legs-Up-the-Wall" variation of Viparita Karani with the weight of the hips and legs supported by the prop and the hands resting palms up on the floor beside you for 5-10 slow and smooth breaths. However, this "safer" version will never help to develop the abdominal strength required to keep the legs lifted straight above the torso in the full "Inverted Pose."
  • After you've warmed up and conquered your fears of being inverted, you are now ready for the more intense, self-supported variation of Viparita Karani, using the strength of the abdominal muscles in eccentric contraction. That is they are working to support your weight while in a lengthened position. Begin on your back in "Bridge Pose" with the heel of the hands only slightly aiding in the support of the hips. Expand the chest with a full inhalation while grounding the feet firmly, and then draw up the pelvic floor muscles (mula bandha) and the abdominals (uddiyana bandha) before exhaling the chin toward the lifted chest in the "chin and throat lock" called jalandhara bandha. In this way you'll be able to experience all three locks or bandhas engaged simultaneously to hold the heat and energy in the core of the body. This locking and sealing action prevents heat energy from entering the head and it encourages the cleansing effects associated with the upward movement of apana (toxic gases.) On the next inhalation slowly extend one leg at a time directly above the hips. pressing through active feet to engage the muscles and joints in order to support the weight of both legs rather than collapsing the body weight into the wrists. Remain in this healing and restorative position with all three locks engaged for 5-10 breaths, or whatever your body is ready to support. When returning back to "Bridge Pose" keep all three "locks" engaged and hug leg muscles to the bones in order to control the slow release of one foot at a time onto the floor directly under the knees. Then release the hands, pressing both feet into the floor, and slowly roll down from the top of the spine one vertebra at a time.
  • Mentally---In order to prevent the pelvis from collapsing onto the hands the mind must be actively engaged and focused on utilizing the "locks" to help support the majority of body weight. Otherwise, the wrist joints will be stressed and the subsequent discomfort will interfere with the concentration and ultimate enjoyment in this very beneficial pose. This "Inverted Pose" presents a wonderful opportunity to practice the kapalabhati style of breathing with vigorous exhalations while the locks remain engaged.
  • Spiritually---The subject of "facing monsters" or fears can be a very sensitive subject for most of us. Therefore, always proceed in your yoga practice with slow and mindful caution. Breathe in the confidence that our bodies have been created to be able to perform amazing things when we trust them and their Designer, who loves us. Since I believe that love demands that we trust, before I enter into postures (asanas) that involve some degree of risk, I remind myself of the inspirational words in the First Book of John:
"There is no fear in love; but perfect love caseth out fear; because fear hath torment. He that feareth is not made perfect in love." ( I John 4:18, KJV)

Practice trusting yourself and your God by loving both perfectly....plf

Monday, September 21, 2009

"Changing Things Up (or Down) a Bit"

It's been said, "Variety is the spice of life." If that's the case, then performing the same posture, but from a different starting position or in a different direction will add some spice to your yoga practice. As I mentioned in last week's blog, we rarely "bend over backwards" in our daily activities, so performing backward bending postures can serve as counterposes to all of the forward bends where we spend most of our time. This week we'll turn our "bow" upside down.
An enjoyable variation to last week's "Upward-facing Bow Pose" involves putting your body in the same backward bending position, but facing downward.
When I was bored as a child I would play around with this week's posture (asana), called "Downward-Facing Bow Pose" (Dhanurasana) thinking it was great fun, but not realizing I was practicing a yoga position. Back then, in the 1950's before yoga became mainstream in America, we called it "rocking horse" because we could rock back and forth on our stomachs while holding both feet high in the air. As we age our spines become more rigid, and so this posture can help to bring back some elasticity in the spine while toning the abdominal organs. Besides, it changes our perspective, and it's nostalgic!
Like most things in life, a little preparation helps a lot! I like to prepare my tight shoulders for "Bow Pose" by first lying on my side in "Side Bow" (Parsva Dhanurasana) and then rolling onto my stomach. Although this
side variation is slightly more difficult, for me it's especially effective in opening the pectoral muscles across the front of my chest, one side at a time, by using the weight of the body to create gentle pressure. Warning: Do not attempt "Side Bow" if you have a dislocated shoulder injury!
  • Physically---To begin in "Downward-facing Bow Pose" (Dhanurasana) lie on the stomach with the arms behind the back and the weight of the head resting on the chin. While inhaling deeply, look up and engage the pelvic floor and abdominal muscles (the bandhas) during the lifting and lengthening of the torso. Exhale slowly while pressing the pubic bone down and forward in a reverse or backward (posterior) tilt of the pelvic basin. Then inhale while interlacing the fingers behind the back in a chest expansion, and lifting the head and torso as high as possible to free the rib cage. Exhale while bending the knees and reaching one hand at a time onto the outer ankles with the knees and ankles apart. With each inhalation allow the chest to lift and expand as the feet lift upward, opening the front body into a bow shape. Allow the arms to perform the action of the bow string to bend the body backward. Keep the head and the gaze lifted while attempting to lift the ribs and the pelvic bones away from the floor. If your quadriceps in the front thighs are tight, you may need to use a strap or belt wrapped around both ankles and simply hold onto the strap as close to the ankles as possible. Once the front of the body has reached the maximum stretch, called your "edge", the inner knees and ankles may be pressed together to hold your "Bow Pose" for 3-5 breaths. Due to the pressure on the diaphragm and the abdomen, inhalations may be restricted so I find it helpful to emphasize the end of each breath with rigorous exhalations, called kapalabhati breathing.
  • To further release the shoulder joints, roll into "Side Bow Pose" (Parsva Dhanurasana), first on the right side of the body to compress the ascending large colon on the right. OR begin by lying on your right side with both knees bent at right angles and your right hand behind your back. Inhale deeply while turning the head to the left and looking over the left shoulder. Exhale and rest the back of the head on the floor as the right arm stretches to firmly grip the outside of the right ankle. On the next deep inhalation open the left shoulder as the left arm reaches behind the back to securely grip the outside of the left ankle with the left hand. Exhale slowly while releasing the weight of the torso into the right shoulder, and feel the gentle, passive stretch in all of the pectoral muscles across the front of the chest. At first, keep the knees and ankles apart until the hands and feet have stretched away from the torso to reach the "edge" and then relax the knees and ankles together for 3-5 slow breaths.
  • Inhale to roll back to the centered "Bow Pose" for several breaths, and then exhale onto the left side of the body by lifting and moving the right leg to the left first. Remain on the left side for the same number of breaths in order to balance the stretch and pressure on each side of the abdomen. To finish, roll onto the back and relax for several minutes in the "Corpse Pose" (Savasana) which was described at the end of the January 24th blog.
  • Mentally---While your body is in these backward bending poses the breath will be more rapid and seem more shallow than usual because the abdomen and ribs are almost "stuck" in expansion. Therefore, it's crucial to fully exhale all toxic gases by using the rigorous exhalations of kapalabhati breathing. Keep the mind present in the body by focusing on conscious breathing, counting the number of breaths on each side and in each variation. Notice the gentle massaging of the abdominal organs that is different from "Upward-Facing Bow Pose." Pay close attention to the lifting action as the "root locks" (pelvic floor and abdominal muscles) are engaged. Notice how the energy moves in an upward flow or direction. As always, feel your body as you find each invigorating breath.
  • Spiritually---Hopefully we all realize how important our perspective is when experiencing anything. Only when we walk in another's shoes can we really understand---as in "stand under" the same tree! When practicing yoga positions from different perspectives we broaden our ability to understand all the repercussions of that position from different perspectives. One of my favorite chapters in the Holy Bible is found in the apostle Paul's first letter to the church in Corinth. As we yoke with our God and become one with Him, our perspective will change drastically! I look forward to knowing as I am known. plf
"When I was a child, I spake as a child, I understood as a child, I thought as a child; but when I became a man, I put away childish things. For now we see through a glass, darkly; but then shall I know even as also I am known." (I Corinthians 13:11-12, KJV)